XML Reports
Talking about the features of XML Reporting is one thing, but let's see what it takes to actually generate an XML report. We're going to exercise most of the basic features of the XML Report tool, including conditional and looping constructs.
Our goal with this report will be to show the shirts in stock. Throughout this entire stylesheet design process, notice we don't actually care whether the report will be going to become a web page in HTML or a PDF document. We actually don't have to decide that at all, until we need the actual output.
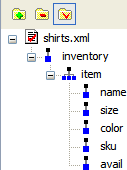
Here's a portion of our input data:
<inventory>
... |
(For those of you who are more comfortable reading a schema, see shirts.dtd or shirts.xsd.)
Assign an XML Data Source
There can be multiple data sources, with differing types. XML,
EDI, relational
and flat file or text data can be mixed and merged
in any way. After doing File|New|XML Report, we're going to click on
the  icon and choose
shirts.xml.
Build a List of XML Data
Just as a quick test, let's make sure that what we set up works. Drag the "item" from the tree over to the canvas, and choose "List" from the menu that pops up. Then drag "sku" from the tree over and plop it down next to the bullet. When that second menu appears, choose "Insert Value".
When you press the  button, you should see:
|
Now, hit  a couple of times
to undo adding the list, and instead, let's start building our report.
a couple of times
to undo adding the list, and instead, let's start building our report.
Build a Table of XML Data
Let's start building out table. This is actually easier than building the list, since we can do it in one step. Drag "item" from the tree onto once-again blank canvas, and choose "Insert Table" and "Populate Columns" from the sub-menu. You will see something like this:

The symbol  means
that the section its right will iterate, or repeat, for all values matching some XPath expression. This is used
for tables,
lists, and a special raw
repeater construct.
means
that the section its right will iterate, or repeat, for all values matching some XPath expression. This is used
for tables,
lists, and a special raw
repeater construct.
to see how things
are going.
XML Report Headers and Footers
We should put headers on this report. So right-click anywhere in the table row and choose "Add Row Before". Notice that the repeat symbol does not expand to cover that row, showing that it won't be part of what repeats. Within each cell, type a description of the contents.
Something similar can be done for footers. And using the dynamic
property settings, the total can be expressed as an XPath expression, like sum(/inventory/item/avail).
Changing XML Report Properties
Each object in the report has various properties associated with it. And for composite components, such as tables, there are tiers of properties. This lets you set properties for the whole table, and override them by row or column or even cell.
Just to see this, go to the  value element and set its "Text" property for "Alignment" to read "Center". Now running the report will show the "S",
"M" or "L" centered instead of left-aligned.
value element and set its "Text" property for "Alignment" to read "Center". Now running the report will show the "S",
"M" or "L" centered instead of left-aligned.

Insert Images into the XML Report
Let's show the viewers of this report what the actual polo shirt colors look like.
- Insert a column after the "color" column
- Right-click on that column and insert an image
- Change the Source property's Context to
$item - Change the Source property's XPath to
concat('shirt-', substring(sku, 2), '.gif')
(If you are following along, you might have trouble since you don't have the shirt images locally.
Click on the canvas outside of the table, and set the "Base URL" property to
http://www.stylusstudio.com/images/publish.)
Filtering XML Report Data
Adding the equivalent of a SQL WHERE-clause is as simple as modifying the XPath expression for the repeater.
Change the property from the default /inventory/item to /inventory/item[avail > 0].
XML Report If-Then-Else
Any component, from text to list to table, can also be inserted into an if-then-else component. The if construct is a special component with two boxes. Anything placed in the "then" box gets displayed only when the associated XPath is true. Otherwise, what is placed in the "else" box gets displayed.
For our example, we'll show a "NEW" image next to all of the small shirts, since our store has just started carrying that size.
- Insert a column after the "avail" column
- Right-click and insert an If construct
- Set the "Condition" property to
size = "S" - Make sure the "then" view is showing, and insert an Image construct
- Set the "Source" property of the image to
new.gif
XML Report Summary
Here's how it will all look, after we've created a report, set filtering, and added images and conditional. A copy of the completed XML report called shirts.report is here.
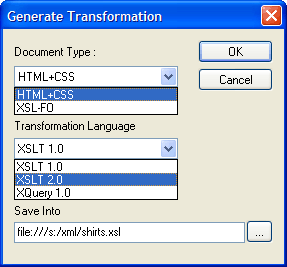
Generate XSL-FO and HTML+CSS
When you're ready to use this report in production, you can save it as XSLT 1.0, XSLT 2.0 or XQuery. And you can choose the output format to be either HTML+CSS, or XML-FO — the latter of which can be directly post-processed into PDF.
Here's a view of the dialog that appears when you press the
 button:
For more on this, see Single Source Publishing and the follow-on Multi-Channel Publishing.