Home >Online Product Documentation >Table of Contents >Using Stylus Studio with Source Control Applications
Using Stylus Studio with Source Control Applications
Stylus Studio supports the Microsoft Source Code Control Interface, allowing you to use Stylus Studio with any source code control system that supports the same interface used by Microsoft Visual Studio or Microsoft Visual Studio .NET.
Stylus Studio's source control support allows you to
In this section
This section covers the following topics:
Tested Source Control Applications
Integration with the following source control applications has been tested:
Prerequisites
To use Stylus Studio's source control features, you must have already installed the client software for your source control application, as shown in Table 5.
When Data Is In
|
You Need to Install
|
|---|---|
SourceSafe repository
|
SourceSafe client or SourceOffSite
|
ClearCase
|
Attache client
|
CVS
|
Zeus-CVS product
|
In addition, files must belong to a Stylus Studio project before you can use them with a source control application.
Recursive Selection
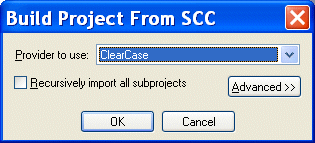
When you build a project using files from a source control application, Stylus Studio gives you the option of recursively importing all projects that are subordinate to the project folder you select. This option, Recursively import all subprojects, appears on the Build Project from SCC dialog box, which appears when you start the New Project Wizard.
Selecting the Recursively import all subprojects option has the effect of selecting all the siblings of the selected file or directory, as well as any descendants of the selected item and its siblings. Stylus Studio creates a project that contains all files that Stylus Studio can open (for example, .xml, xslt, and .xsd files) and that are in the directory hierarchy of the file or directory you select.
For example, suppose you check Recursively import all subprojects, and you select c:\work\myproject\documentation.xml. Stylus Studio creates a project that contains all Stylus Studio-editable files in c:\work\myproject and its subdirectories.
If you do not check Recursively import all subprojects, only the file you select is added to the new Stylus Studio project you create. You cannot select a directory if you do not select this option.
Using Stylus Studio with Microsoft Visual SourceSafe
To use Stylus Studio to operate on files that are under SourceSafe source control:
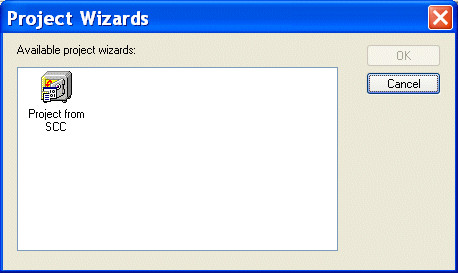
The Project Wizards dialog box appears.
The Build Project From SCC dialog box appears.
Depending on your installation, you might need to specify other properties. See Specifying Advanced Source Control Properties.
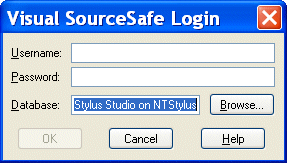
The Visual SourceSafe Login dialog box appears:
The Create Local Project from SourceSafe dialog box appears.
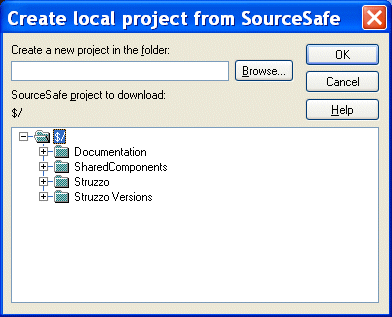
The project is created in Stylus Studio. A message displays the names of any files that were not added to the project because their extensions are not associated with a Stylus Studio editor.
Using Stylus Studio with ClearCase
To use Stylus Studio to operate on files that are under ClearCase source control:
The Project Wizards dialog box appears.
The Build Project From SCC dialog box appears.
Depending on your installation, you might need to specify other properties. See Specifying Advanced Source Control Properties.
The Browse for Folder dialog box appears.
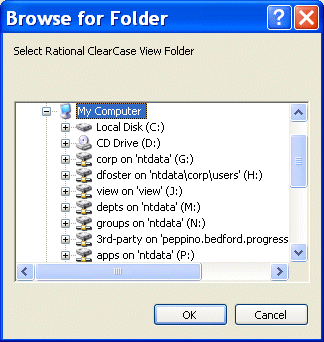
Stylus Studio creates a new project that contains the file you selected, or all files that are editable by Stylus Studio and that were in the directory hierarchy of the file you selected. The default name of the project is Projectn. To rename the project, select Project > Save Project As from the Stylus Studio menu bar.
Adding Files After the Project is Created
After you create the project, you can add additional ClearCase files to it. If the file is already in ClearCase, it must be a sibling of the original file you selected, or it must be a descendant of one of its siblings. If the file you want to add is not in the directory hierarchy of the original file, you must create a new Stylus Studio project and specify a directory in the source control hierarchy that contains all the files you want to be in your Stylus Studio project.
If you want to add a file that is not already in ClearCase, open the file in Stylus Studio and then click Add To Source Control![]() in the Stylus Studio tool bar.
in the Stylus Studio tool bar.
Using Stylus Studio with Zeus CVS
Stylus Studio supports the latest version of the Zeus CVS Provider, and with some additional configuration needed in the SourceControl > Properties dialog box.
To use Stylus Studio to operate on files that are under Zeus CVS source control:
The Project Wizards dialog box appears.
The Build Project From SCC dialog box appears.
CVSROOT environment variable that you use to access the CVS server.
For example, suppose you are required to enter the following commands in a DOS console or UNIX shell:
The value you should enter in the Auxiliary Path field would be:
Stylus Studio downloads the selected files and places them in the directory you specified in the Working Dir field. If you move these files from this directory, you must specify the new directory that contains the files in the Local Project Path field of the Source Control Properties dialog box. To open this dialog box, select SourceControl > Source Control Properties from the Stylus Studio menu bar.
All files that can be opened in Stylus Studio are now in the new Stylus Studio project. The default name of the project is Projectn. To rename the project, select File > Project > Save Project As from the Stylus Studio menu bar.
Specifying Advanced Source Control Properties
The Advanced button in the Build Project From SCC dialog box displays several additional fields.
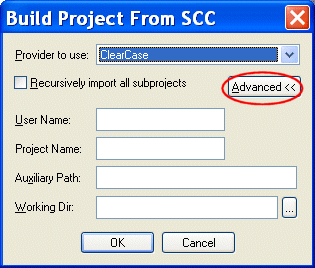
- User Name is the name of the source control user. Stylus Studio uses this name to establish a connection with the source control server.
- Project Name is the name of the source control repository you want to access. The syntax of the project name depends on the source control provider you want to connect with. For example, SourceSafe uses
$/Name/Name, ClearCase uses the name of the view, and CVS uses the name of the module. Some source control providers change this description to something more suitable to their model. For example, ClearCase changes it to ClearCase Attache. - Auxiliary Path contains source control provider-specific information. This field allows you to enter any other information required to find your source control server. For example, if you are using SourceSafe, you would specify the directory of the SourceSafe client here. If you are using CVS, you would specify the contents of the
CVSROOTenvironment variable. - Working Dir is the local directory into which you copied the files under source control that you want to access. It is the local counterpart for the source control repository. For example, suppose you copied the contents of the SourceSafe repository
$/Company/OneProjectto the local directoryc:\work\myproject. Your local files would map to the source control hierarchy as shown in Table 6: